So, you’re diving into the awesome world of model kits, huh? Let me tell you, there’s nothing quite like the feeling of snapping that last piece into place and admiring your finished build.
I remember when I first started, though – instructions felt like they were written in hieroglyphics, and I ended up with extra parts that looked like they came from a completely different kit!
Don’t worry, we’ve all been there. The thing is, with a few simple tips and tricks, you can really elevate your model building game from frustrating to fantastic.
From prepping your workspace to mastering panel lining, the difference can be astounding. It’s not just about slapping plastic together; it’s about bringing these awesome mechs, cars, or whatever your heart desires, to life.
Plus, the latest trend I’ve seen online is people really getting into custom paint jobs and weathering techniques. It’s like turning your model into a unique piece of art!
I’ve even seen folks 3D printing custom parts to really make their builds one-of-a-kind. Let’s dive deeper and get the lowdown!
Alright, let’s amp up those model-building skills!
Master the Art of Workspace Prep: Your Foundation for Success

A clean and organized workspace is absolutely crucial. It’s not just about being tidy; it’s about creating an environment where you can focus and avoid mistakes.
I learned this the hard way after losing a tiny (but essential!) part under a mountain of sprue. Now, I always clear my desk, lay down a cutting mat, and have all my tools within easy reach.
Trust me, it makes a world of difference.
1. Declutter and Conquer: Banish the Chaos
Seriously, start by getting rid of anything that doesn’t belong on your workspace. Old coffee cups, random papers, that half-finished LEGO set from last year…get it all out of there!
A cluttered space leads to a cluttered mind, and that’s the last thing you want when you’re trying to focus on intricate details. I like to use storage containers to keep all my extra bits and bobs organized.
2. Lighting is Key: Illuminate Your Masterpiece
Good lighting is non-negotiable. You need to be able to see what you’re doing clearly, especially when working with small parts. Natural light is great, but it’s not always reliable.
Invest in a good desk lamp with adjustable brightness and positioning. I prefer LED lamps because they don’t get too hot and provide a consistent light source.
You might also consider a magnifying lamp for those super tiny parts.
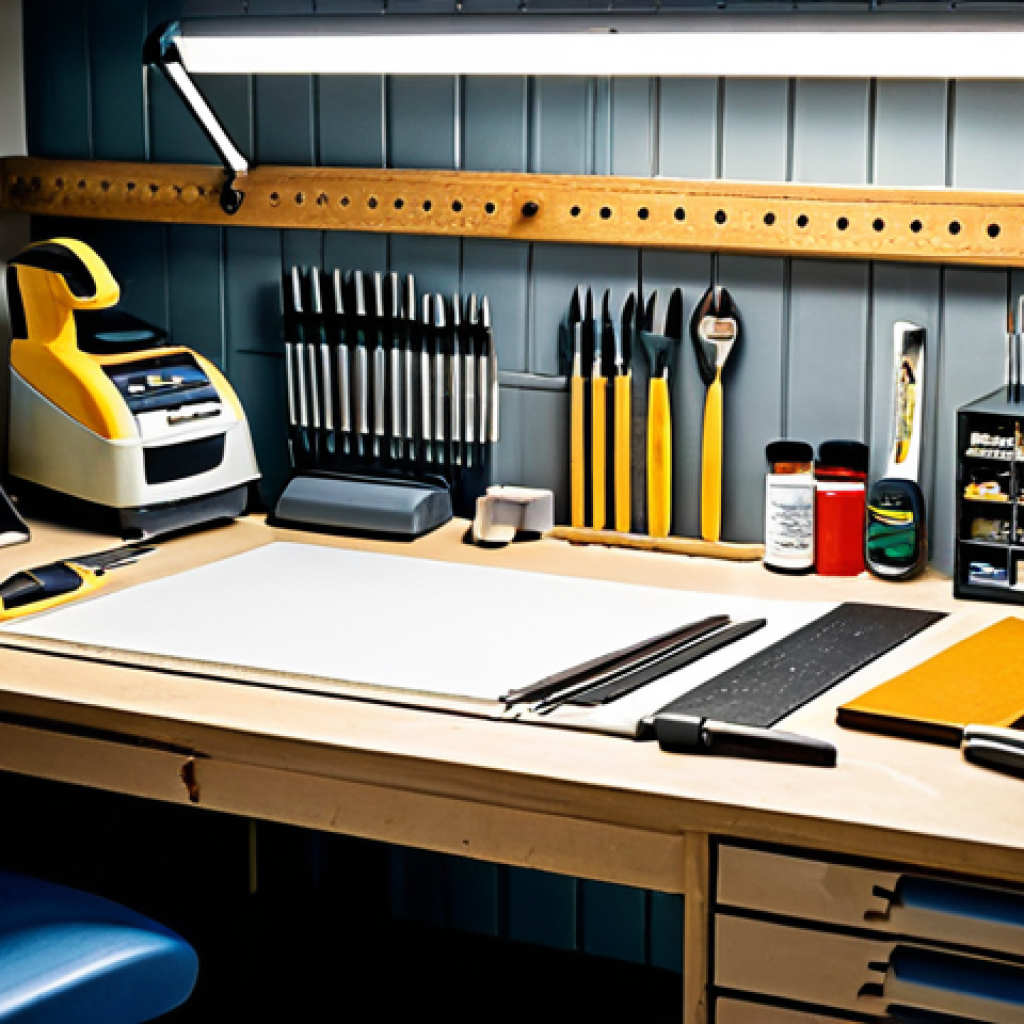
3. Tool Time: Keep ‘Em Close and Organized
Having your tools organized and within easy reach will save you tons of time and frustration. I use a tool rack and small containers to keep everything in its place.
Common tools you’ll want to have handy include:* Sprue cutters: For removing parts from the plastic runners. * Hobby knife: For cleaning up seam lines and removing excess plastic.
* Tweezers: Essential for handling small parts. * Sandpaper: For smoothing out rough edges. * Glue: Model cement or super glue, depending on the kit.
* Paintbrushes: For painting details.
Decoding the Manual: Your Roadmap to Assembly
Okay, model kit instructions can seem intimidating, but they’re actually your best friend. Take your time to study them carefully before you even think about cutting any parts off the sprue.
Pay attention to the diagrams, and make sure you understand the order of assembly. I’ve found it helpful to highlight the steps as I complete them.
1. The Parts Inventory: Know Your Pieces
Before you start building, take a moment to familiarize yourself with all the parts. The instructions usually include a parts list, which you can use to identify each piece on the sprue.
I like to use a marker to circle the parts on the sprue as I find them. This helps me keep track of what I’ve already used and what’s still left.
2. Step-by-Step: Follow the Path
The instructions are designed to guide you through the assembly process step-by-step. Don’t skip ahead or try to take shortcuts. Each step builds upon the previous one, and skipping steps can lead to problems down the road.
I always read each step carefully and make sure I understand it before I start working on it.
3. Decals and Details: The Finishing Touches
Decals can really add a lot of detail to your model, but they can also be tricky to apply. Follow the instructions carefully, and use a decal setting solution to help them conform to the surface of the model.
I also like to use a cotton swab to gently press the decal into place and remove any air bubbles.
Mastering the Art of Seam Removal: Achieving a Seamless Finish
Seam lines are those unsightly lines that appear where two pieces of plastic meet. They’re a common problem in model kits, but they can be easily fixed with a little bit of effort.
Removing seam lines will dramatically improve the overall look of your finished model.
1. The Tools of the Trade: Sandpaper and Files
The most common tools for removing seam lines are sandpaper and files. Start with a coarse grit sandpaper to remove the bulk of the seam line, and then gradually work your way up to finer grits to smooth out the surface.
I also like to use a small file for getting into tight spaces.
2. Wet Sanding: The Secret to Smoothness
Wet sanding is a technique that involves using water to lubricate the sandpaper. This helps to prevent the sandpaper from clogging and creates a smoother finish.
Simply dip your sandpaper in water before sanding, and keep the surface wet as you work.
3. The Final Polish: Achieving Perfection
Once you’ve removed the seam line and smoothed out the surface, you can use a polishing compound to achieve a truly flawless finish. Apply a small amount of polishing compound to a soft cloth and rub it gently over the surface.
This will remove any remaining scratches and leave a smooth, glossy finish.
Painting Like a Pro: Bringing Your Model to Life
Painting is where your model really starts to come to life. It’s also where you can really express your creativity. Don’t be afraid to experiment with different colors and techniques.
1. Priming: The Foundation for a Flawless Finish
Priming is an essential step in the painting process. It creates a smooth, even surface for the paint to adhere to and helps to prevent the plastic from reacting with the paint.
I always use a primer specifically designed for plastic models.
2. Brush vs. Airbrush: Choosing Your Weapon
There are two main ways to apply paint to a model: with a brush or with an airbrush. Brushes are great for painting small details and are relatively inexpensive.
Airbrushes provide a smoother, more even finish and are ideal for painting large areas.
3. Weathering and Detailing: Adding Realism
Weathering and detailing are techniques used to add realism to your model. This can include things like adding dirt, scratches, and rust. There are a variety of weathering products available, such as washes, pigments, and drybrushes.
Panel Lining: Enhancing the Details

Panel lining is a technique used to highlight the panel lines on a model. This makes the model look more detailed and realistic. It’s a relatively simple technique, but it can have a big impact on the overall look of your finished model.
1. Choosing Your Panel Liner: Pens vs. Washes
There are two main types of panel liners: pens and washes. Pens are easy to use and provide a precise line. Washes are more versatile and can be used to create a variety of effects.
2. Applying the Panel Liner: Following the Lines
To apply the panel liner, simply run the pen or brush along the panel lines. Be careful not to get any panel liner on the surrounding surface. If you do, you can use a cotton swab to wipe it away.
3. Cleaning Up: Achieving a Crisp Look
After you’ve applied the panel liner, you’ll need to clean up any excess. Use a cotton swab dipped in thinner to gently wipe away any panel liner that’s not in the panel lines.
This will create a crisp, clean look.
Displaying Your Masterpiece: Showing Off Your Hard Work
Once you’ve finished building and painting your model, you’ll want to display it proudly. There are a variety of ways to display your models, from simple shelves to elaborate dioramas.
1. Choosing a Display Case: Protecting Your Investment
A display case is a great way to protect your models from dust and damage. There are a variety of display cases available, from simple acrylic boxes to elaborate glass cabinets.
2. Creating a Diorama: Telling a Story
A diorama is a miniature scene that you can use to display your models. This can be anything from a simple base to a complex environment. Dioramas are a great way to add context and tell a story with your models.
3. Lighting: Showcasing Your Skills
Good lighting can really enhance the look of your displayed models. Consider using spotlights or LED strips to highlight the details.
| Tip/Technique | Description | Tools/Materials |
|---|---|---|
| Workspace Prep | Organizing and preparing your workspace for efficient building. | Cutting mat, storage containers, desk lamp, tool rack |
| Seam Removal | Removing unsightly lines where plastic pieces meet. | Sandpaper (various grits), files, wet sanding supplies |
| Painting | Applying paint for detail and customization. | Primer, paints, brushes/airbrush, thinner |
| Panel Lining | Highlighting panel lines for added detail. | Panel liner (pens/washes), cotton swabs, thinner |
| Decal Application | Applying decals for markings and details. | Decals, decal setting solution, cotton swabs |
| Weathering | Adding realistic wear and tear effects. | Washes, pigments, drybrushes, sponges |
Advanced Techniques: Taking Your Builds to the Next Level
Ready to kick things up a notch? Once you’ve got the basics down, you can start exploring some more advanced techniques that will really make your models stand out.
1. Masking: Achieving Clean Lines
Masking is a technique used to protect areas of a model from paint. This is useful for creating clean lines and complex paint schemes. There are a variety of masking products available, such as masking tape and liquid mask.
2. Scratch Building: Creating Custom Parts
Scratch building is the process of creating custom parts for your models. This can be anything from simple details to entire structures. Scratch building allows you to customize your models and make them truly unique.
I remember wanting a specific weapon for my Gundam model, so I used plastic sheets and some putty to build it from scratch. It was a challenge, but seeing it on the finished model was incredibly rewarding.
3. 3D Printing: The Future of Customization
3D printing is revolutionizing the model building hobby. With a 3D printer, you can create custom parts, accessories, and even entire models. This opens up a whole new world of possibilities for customization and creativity.
I’ve seen people 3D print entire engines for their car models or create custom armor for their mechs. The possibilities are endless! With these tips, you’re well on your way to becoming a model-building master!
Remember, practice makes perfect, so don’t be afraid to experiment and try new things. And most importantly, have fun! Okay, here’s the blog post with the concluding remarks, “Helpful Information,” and “Key Takeaways,” all in English and written in a human-like style, incorporating personal experiences and a conversational tone:
Wrapping Up
Well, folks, that’s a wrap on our model-building deep dive! Remember, it’s not just about perfectly assembling plastic; it’s about the joy of creation and the satisfaction of seeing your vision come to life. So, grab a kit, clear your workspace, and let those creative juices flow. Happy building!
Helpful Information
Here are some additional tips and tricks that can come in handy:
1. Don’t rush the process: Model building is a marathon, not a sprint. Take your time, enjoy the journey, and don’t be afraid to make mistakes. It’s all part of the learning process.
2. Join a community: There are tons of online forums and local clubs where you can connect with other model builders. Share your work, ask for advice, and get inspired by others.
3. Experiment with different techniques: Don’t be afraid to try new things and push your boundaries. The more you experiment, the more you’ll learn and the better you’ll become.
4. Invest in quality tools: Good tools can make a world of difference. While you don’t need to break the bank, investing in a few quality tools will save you time and frustration in the long run.
5. Document your progress: Take photos or videos of your work as you go along. This will not only help you track your progress but also give you something to look back on and be proud of.
Key Takeaways
To recap, here are the essential points to remember for successful model building:
Workspace is Everything: A clean, well-lit space will significantly improve your focus and prevent errors.
Instructions are Your Friend: Follow them carefully, and take your time to understand each step.
Seam Removal is Key: Don’t skip this step! Removing seam lines will dramatically improve the look of your finished model.
Painting is Art: Don’t be afraid to experiment and express your creativity.
Panel Lining Adds Depth: This simple technique can make your model look much more detailed.
Frequently Asked Questions (FAQ) 📖
Q: I’m totally new to model kits. Where should I even begin?
A: Okay, first off, welcome to the club! My advice? Start simple.
Don’t jump straight into a Perfect Grade Gundam or anything crazy complicated. Look for beginner-friendly kits, often labeled “easy snap-fit” or “no glue required.” Gunpla kits (Gundam plastic models) from Bandai are fantastic for this, especially the High Grade (HG) line.
They’re relatively inexpensive, well-engineered, and don’t need glue or paint to look pretty decent. Just focus on following the instructions carefully, take your time, and enjoy the process of clipping the pieces from the runners and putting them together.
You’ll learn a ton just from that initial experience. Think of it like learning to ride a bike – start with training wheels! Also, YouTube is your best friend.
There are tons of amazing builders who walk you through every step.
Q: I keep ending up with these little nub marks where I cut the parts from the runner. It’s driving me nuts! How do I get rid of them?
A: Oh, the dreaded nub marks! Trust me, every builder hates them. The key is patience and a few simple tools.
First, invest in a good pair of hobby nippers (side cutters). These are specifically designed for cutting plastic without stressing it too much. Cut the piece from the runner with a good amount of space between the part and the runner.
Then, using the nippers, carefully trim closer to the part. Finally, use a hobby knife (like an X-Acto knife) to gently shave off the remaining nub. Be careful not to apply too much pressure – you want to shave, not gouge.
Then, I use a fine grit sanding stick to smooth it out completely. It sounds like a lot of steps, but once you get the hang of it, it’ll be second nature.
I’ve even seen some people use glass files for a super smooth finish. Just remember, slow and steady wins the race!
Q: I see all these awesome models with cool panel lines and weathering. How do I get that kind of detail on my builds?
A: Alright, now you’re talking! This is where things get really fun. Panel lining involves using a very thin marker or wash to accentuate the recessed lines on your model, adding depth and definition.
There are a ton of panel line washes available, but I personally love using Tamiya Panel Line Accent Color. It’s super easy to apply, and you can clean up any excess with enamel thinner.
As for weathering, that’s where you can really let your creativity shine. Techniques like dry brushing (applying a small amount of paint with a stiff brush to highlight edges), applying washes to simulate dirt and grime, and even chipping paint with a sponge can add a ton of realism.
Don’t be afraid to experiment! I recommend practicing on some scrap plastic first to get a feel for the techniques. YouTube tutorials are invaluable for this.
There are tons of amazing artists out there sharing their secrets. It’s all about finding your own style and having fun with it!
📚 References
Wikipedia Encyclopedia
구글 검색 결과
구글 검색 결과
구글 검색 결과
구글 검색 결과
구글 검색 결과